Easy Raspberry Freezer Jam: Your No-Cook Path to Preserving Summer's Best
Imagine biting into the vibrant, sun-kissed flavor of fresh raspberries, even in the dead of winter. That dream is not only achievable but incredibly simple with Master Homemade Raspberry Freezer Jam for Intense Flavor. Forget the daunting, time-consuming process of traditional canning, the endless pots bubbling on the stove, and the concern over sterilizing jars perfectly. This no-cook method for raspberry freezer jam revolutionizes how you preserve the sweet-tart goodness of one of summer's most beloved berries. It’s a game-changer for anyone who craves homemade quality without the hassle, offering a burst of pure fruit flavor and a striking ruby-red color that canned jams simply can't match. Get ready to transform a handful of ingredients into a pantry staple that will brighten your breakfasts and desserts all year long.
Why Choose No-Cook Raspberry Freezer Jam?
The appeal of raspberry freezer jam lies in its remarkable simplicity and the superior quality it delivers compared to its cooked counterparts. If you're new to making jams or simply short on time, this method is your perfect entry point into the world of homemade preserves.
Preserves Unbeatable Fresh Flavor
The most significant advantage of no-cook jam is right in its name: no cooking! Traditional jams involve boiling fruit and sugar for extended periods, which, while effective for shelf-stable preservation, inevitably dulls the delicate flavor and vibrant color of fresh raspberries. With easy raspberry freezer jam, the fruit is minimally processed, allowing its natural brightness, sweetness, and slight tartness to shine through intensely. It tastes like biting into a fresh berry, but in jam form.
Simple, Quick, and Accessible
No special canning equipment? No problem! This method eliminates the need for water bath canners, pressure canners, and the meticulous sterilization procedures that can intimidate many home cooks. All you need are basic kitchen tools, a few ingredients, and freezer-safe containers. The entire process, from mashing berries to filling jars, often takes less than 30 minutes of active time, making it a perfect weekend project or even a quick weekday endeavor.
Vibrant Color and Enhanced Nutrients
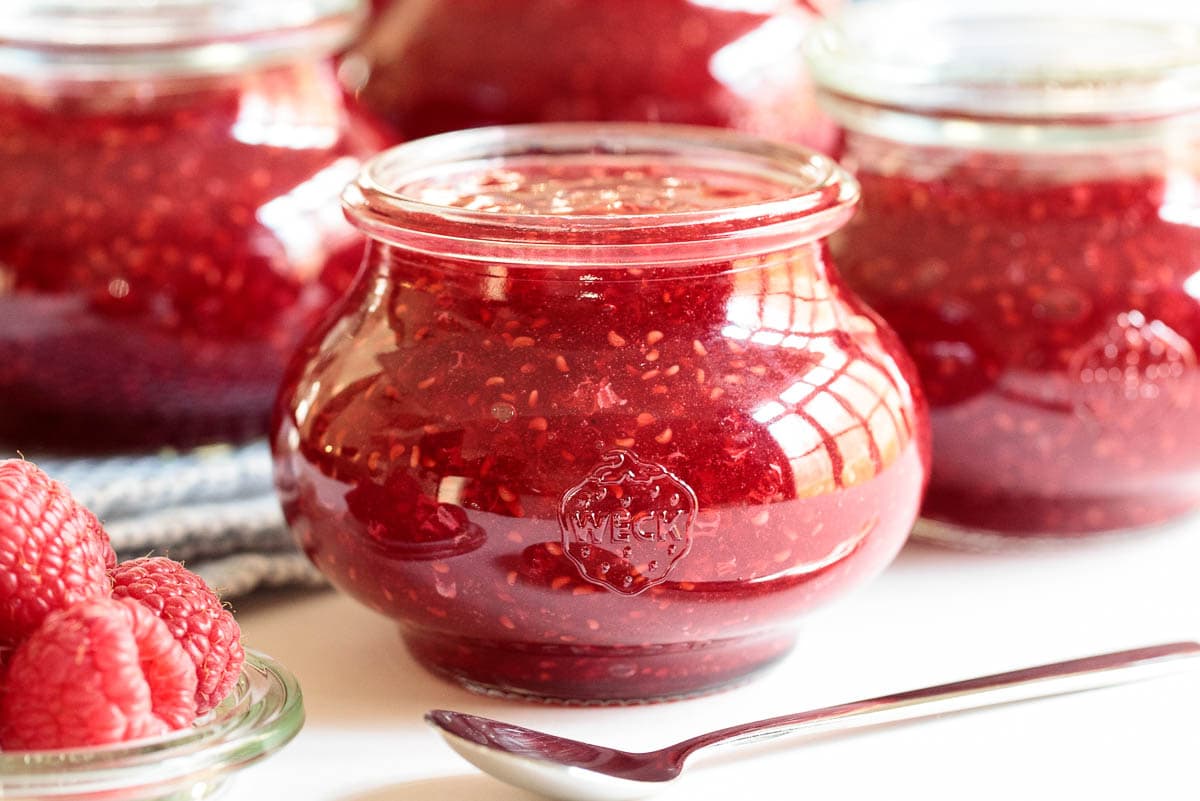
Because the raspberries aren't subjected to prolonged heat, the jam retains its stunning, jewel-toned ruby-red color. This makes for a visually appealing spread that looks as good as it tastes. Furthermore, the gentle preparation helps to preserve more of the natural vitamins and antioxidants present in fresh raspberries, offering a more nutritious option than heavily processed jams.
Versatile and Delicious
Once you've made your first batch of raspberry freezer jam, you'll find countless ways to enjoy it. It's not just for toast! Think swirling it into yogurt, topping pancakes or waffles, layering it in parfaits, using it as a filling for pastries, or even as a glaze for savory dishes. Its fresh, bright flavor is incredibly adaptable.
Essential Ingredients and Equipment for Your Raspberry Freezer Jam
Making delicious raspberry freezer jam requires just a few key ingredients and basic kitchen tools. The beauty is in their simplicity and how they work together to create magic.
Key Ingredients:
- Fresh or Frozen Raspberries: The star of the show! For the best flavor, choose ripe, plump, and firm raspberries. If using frozen, there’s no need to thaw them completely; a slight thaw helps with mashing. Most recipes call for about 4-6 cups of crushed raspberries.
- Granulated Sugar: Essential not just for sweetness, but also for its role in the setting process and preservation. It binds with the pectin and fruit juices to create the jam's characteristic texture. Do not attempt to reduce sugar drastically unless using a specific low-sugar pectin, as it can affect the set.
- Fruit Pectin (Specifically for Freezer Jam): This is crucial for achieving the proper jam consistency without cooking. Look for pectin specifically labeled for "freezer jam" or "no-cook jam" on the package. Brands like Sure-Jell often have specific varieties for this purpose. Regular pectin for cooked jams will not work the same way.
- Lemon Juice (Optional, but Recommended): A small amount of fresh lemon juice adds a bright, zesty counterpoint to the sweetness of the raspberries and can enhance their natural flavor. It's not strictly necessary for the set in freezer jams, but it does improve the overall taste profile.
Must-Have Equipment:
- Large Mixing Bowl: You'll need ample space to combine your ingredients and stir thoroughly.
- Potato Masher or Food Processor: To crush your raspberries to the desired consistency. A masher gives a chunkier jam, while a food processor offers a smoother texture.
- Measuring Cups and Spoons: Accuracy is key for jam making, especially with pectin.
- Sturdy Spoon or Spatula: For vigorous stirring to ensure the sugar fully dissolves.
- Freezer-Safe Containers/Jars: Small plastic containers with tight-fitting lids, or glass canning jars designed for freezing (often straight-sided to prevent breakage), are ideal. Remember to leave adequate headspace for expansion when freezing.
Step-by-Step Guide to Making Easy Raspberry Freezer Jam
Ready to get started? This step-by-step guide will walk you through the incredibly simple process of making your own delicious raspberry freezer jam.
Step 1: Prepare Your Raspberries
If using fresh raspberries, gently wash them under cool water and pat them dry thoroughly. If using frozen, allow them to thaw slightly at room temperature; this makes mashing easier but keeps them cool, which is beneficial. Place the berries in your large mixing bowl. Using a potato masher, crush the raspberries to your desired consistency. Some prefer a chunkier jam with whole berry pieces, while others opt for a smoother spread. If you want a super smooth jam, you can briefly pulse them in a food processor, but be careful not to over-process into a liquid.
Step 2: Combine with Sugar
Measure the granulated sugar precisely according to your pectin package directions (this is crucial for proper setting). Add the sugar to your mashed raspberries in the mixing bowl. Stir the mixture vigorously for about 3-5 minutes, or until the sugar is almost completely dissolved. It's important to stir until you no longer feel many sugar granules when rubbing a small amount between your fingers. This step is vital for flavor development and ensuring a smooth texture. For more insights on achieving that intense flavor, check out Master Homemade Raspberry Freezer Jam for Intense Flavor.
Step 3: Mix in Pectin
Prepare your freezer jam pectin according to the specific instructions on its package. Some brands require mixing the pectin powder with a small amount of water before adding, while others recommend sprinkling it directly over the fruit-sugar mixture. Whichever method your pectin calls for, ensure it's thoroughly combined with the raspberry mixture. Stir for another 3 minutes until the pectin is fully incorporated and the mixture starts to thicken slightly. You want to avoid any clumps of undissolved pectin.
Step 4: Fill and Set
Carefully ladle your freshly made raspberry freezer jam into your clean, freezer-safe containers or jars. Make sure to leave about ½ inch of headspace at the top of each container to allow for expansion when the jam freezes. This prevents your containers from cracking or overflowing. Secure the lids tightly. Let the filled containers sit at room temperature for about 30 minutes to allow the jam to set up further. After 30 minutes, your jam is ready for refrigeration or freezing. For a quick way to enjoy your jam, and to learn more about preserving summer's bounty, explore Quick Raspberry Freezer Jam: Preserve Summer's Berry Best.
Troubleshooting and Tips for Perfect Raspberry Freezer Jam
While making raspberry freezer jam is straightforward, a few tips and tricks can ensure your success and help you troubleshoot common issues.
Jam Not Setting? (Too Runny)
If your jam seems too runny after the initial setting time, don't panic!
- Pectin Type: Double-check that you used pectin specifically for freezer jam. Regular pectin often requires cooking to activate.
- Sugar Measurement: Precision with sugar is key. Too little sugar can prevent the pectin from setting properly. Avoid making drastic sugar reductions unless using a specific low-sugar freezer jam pectin.
- Stirring Time: Ensure you stirred long enough for the sugar to fully dissolve. Undissolved sugar can interfere with the set.
Jam Too Sweet/Tart?
The sweetness of your jam largely depends on the ripeness of your raspberries and the amount of sugar added. While it's generally not recommended to alter the sugar amount with standard pectin, if your berries were exceptionally sweet, you might slightly reduce the lemon juice or vice versa for tart berries. However, significant changes to the sugar-pectin ratio can impact the set.
Storing Your Freezer Jam
- Refrigeration: Once set, your homemade raspberry freezer jam will last for about 3-4 weeks in the refrigerator.
- Freezing: For longer storage, freeze your jam. It will last beautifully for up to 1 year in the freezer. When you're ready to use it, simply transfer a container to the refrigerator and let it thaw for a few hours or overnight.
- Thawing: Thawed jam should be used within 3-4 weeks and generally should not be refrozen once completely thawed.
Creative Uses for Your Raspberry Freezer Jam
Beyond the classic toast and scones, your delicious raspberry freezer jam can elevate many dishes:
- Swirl into Greek yogurt or oatmeal for a burst of flavor.
- Layer in parfaits with granola and fresh fruit.
- Use as a filling for thumbprint cookies, tarts, or crepes.
- Top pancakes, waffles, or French toast.
- Mix into vinaigrettes for salads with a fruity twist.
- Dollop over vanilla ice cream or panna cotta.
- Use as a glaze for roast chicken or pork for a sweet and savory sensation.
Conclusion
Making easy raspberry freezer jam is an immensely rewarding experience, transforming simple berries into a gourmet spread with minimal effort. This no-cook method not only saves you time and stress but also ensures that the vibrant, fresh flavor and stunning color of raspberries are perfectly preserved. From preparing your berries to stirring in the magic of pectin, each step is designed for simplicity and success. So, the next time you find yourself with an abundance of fresh raspberries, or even a bag of frozen ones, remember that the taste of summer is just a few easy steps away. Embrace the joy of homemade preserves and delight in the unparalleled freshness of your very own raspberry freezer jam all year long!
